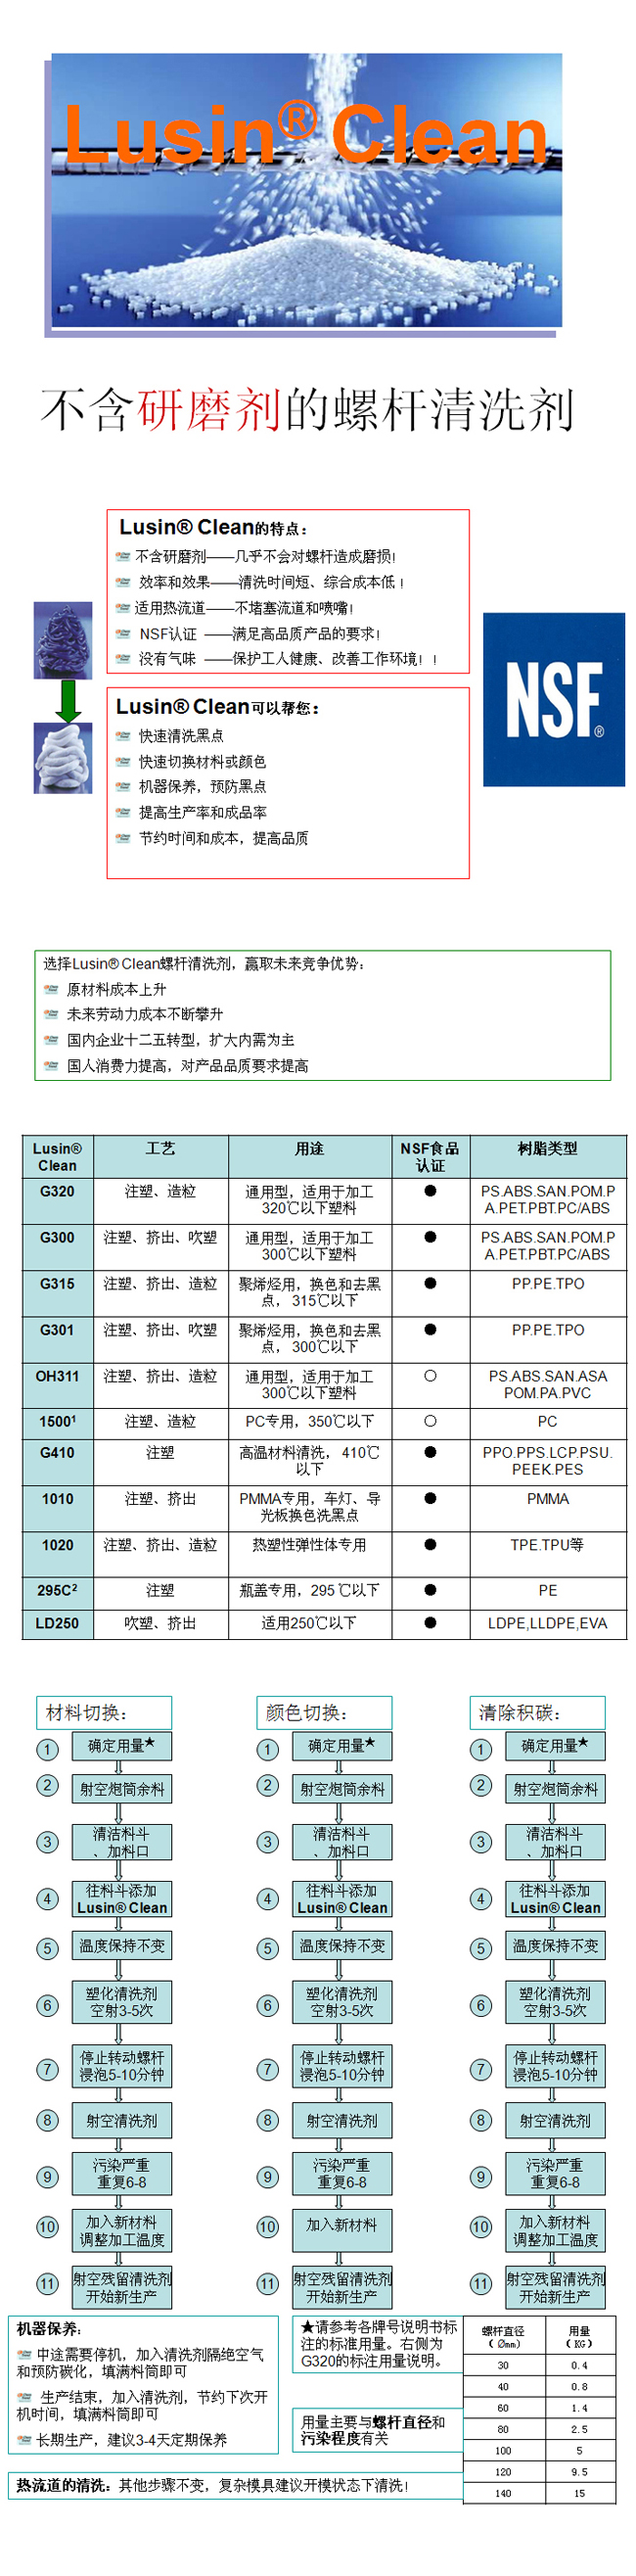
• 订阅RSS Feed
浏览 "未分类"

Ultra Purge™ 5160

三 24, 2019   //   by admin   //   未分类  //  2 评论

Ready-to-Use Purging Compound with Ultra-X™ Technology

Benefits

  • High efficiency
  • Rapid cleaning effect
  • Easy to use
  • Operator and equipment safe
  • Wide application range

Description

Ultra Purge™ 5160 is a ready-to-use purging compound with Ultra-X™ Technology. It can be used for cleaning in injection molding, hot-runners, extrusion, and sheet extrusion applications. Ultra Purge™ 5160 can also be used for the cleaning of screw, barrel, nozzle, hot-runner and gate of injection molding machines processing thermoplastic resins. The purging concentrate consists of highly efficient cleaning additives and does not contain abrasives.

Ultra Purge™ 5160 can be used at processing temperatures from 190°C (374°F) to 320°C (608°F).

The purging compound is especially recommended for color and material change as well as for the removal of black spots, carbon residues and shut-downs.
Ultra Purge™ 5160 is suitable for following thermoplastic resins:

Resin  Suitable
Amorphous resins ++
Crystalline resins
PA, POM +
PET +
Polyolefins
PS +
TPE-TPR +
High-temperature engineering resins
PVC
TPU +
Transparent polyamides, CA, CAB, when switching from any resin to PMMA
When switching from any resin to PC
When switching from any resin to PMMA


Typical Properties

Appearance         Grayish-brown and transparent granules mixed with grayish-brown tablets

Special Notes

  • Do not use on mirror-polished surfaces with hardness lower than 45 HRC.
  • Do not load Ultra Purge™ through heated feeding line - Ultra Purge™ starts to melt at 80°C / 176°F.
  • Do not use more than recommended quantities of Ultra Purge™ per cleaning.
  • Do not increase temperatures when dealing with thermo-sensitive resins or additives.
  • Do not mold difficult-to-eject parts – when molding Ultra Purge™ you may get a short shot.
  • Do not use Ultra Purge™ outside its working temperature range.

Application

This document is a general description on how to use Ultra Purge™. Request your customized instructions by contacting your nearest sales office or local distributor.

Please read carefully the SDS before using Ultra Purge™.

We recommend the following cleaning procedures.

Cleaning of Screw and Barrel – Injection Molding:

  1. Move the injection unit to the back position. We recommend keeping the barrel full of resin when adding Ultra Purge™ in the machine.
  2. Manually remove all possible contamination sources in the hopper/mixer/filters.
  3. Add Ultra Purge™ (1 barrel capacity).
  4. Make injections until you see Ultra Purge™ being ejected through the nozzle.
  5. For machines larger than 500 tons, we recommend reducing the shot size to 20% of the maximum allowed shot size.
  6. Add the next production resin/color directly after Ultra Purge™ and make injections until Ultra Purge™ is displaced from the machine. (In case of material change with different working temperature, empty the barrel from Ultra Purge™ before adding the next production resin and set the temperatures to the next production settings.)
  7. Make 4-5 injections with the next resin to completely displace Ultra Purge™.
  8. If contamination persists, repeat steps.

Cleaning of Hot-Runner System – Mold Open - Injection Molding:

  1. We recommend keeping the barrel full of resin when adding Ultra Purge™ in the machine.
  2. We recommend increasing hot-runner temperatures (tips and manifold), if possible, and nozzle by 30°C/54°F.
  3. Manually remove all possible contamination sources in the hopper/mixer/filters.
  4. Add Ultra Purge™ (1 barrel capacity).
  5. With mold open, make injections until you see Ultra Purge™ being ejected through the hot-runners.
  6. For machines larger than 500 tons, we recommend reducing the shot size to 20% of the maximum allowed shot size.
  7. Add the next production resin directly after Ultra Purge™.
  8. Continue making injections with Ultra Purge™.
  9. Make 4-5 injections with the next resin to completely displace Ultra Purge™. Set all the parameters to the next production settings.
  10. If contamination persists, repeat steps.

Cleaning of Hot-Runner System – Mold Closed - Injection Molding:

  1. We recommend keeping the barrel full of resin when adding Ultra Purge™ in the machine.
  2. If possible, we recommend increasing hot-runner temperatures (tips and manifold) by 30°C/54°F.
  3. Manually remove all possible contamination sources in the hopper/mixer/filters.
  4. Add Ultra Purge™ (1 barrel capacity) and mold parts until 100% Ultra Purge™ is molded into parts.
  5. Add the next production resin directly after Ultra Purge™.
  6. Continue molding parts out of the Ultra Purge™.
  7. Make 4-5 cycles with the next resin to completely displace Ultra Purge™. Set all the parameters to the next production settings.
  8. If contamination persists, repeat steps.

Cleaning for Shut-Down and Start-Up – Injection Molding:

SHUT-DOWN

  1. Move the injection unit to the back position. We recommend keeping the barrel full of resin when adding Ultra Purge™ in the machine.
  2. Add half barrel capacity of Ultra Purge™.
  3. Reduce the shot size and make injections until the barrel is completely empty. DO NOT ADD RESIN AFTER ULTRA PURGE™!
  4. Turn off the machine completely (do not leave heaters in “Maintenance/Idle” mode).

START-UP

  1. Turn on the machines to production settings, load half barrel capacity of Ultra Purge™ followed by your production resin and begin normal production.
  2. If contamination persists, follow the standard cleaning procedure. It is normal to see contamination being flushed out on startup.

Cleaning of Screw and Barrel – Extruder:

  1. We recommend keeping the barrel full of resin when adding Ultra Purge™ in the machine.
  2. We recommend removing the finest layer of the screen pack. Make sure that the pressure or torque force remains within safety limits when running Ultra Purge™.
  3. Add Ultra Purge™ (approximately 1.5 times the extruder barrel capacity).
  4. Extrude at low speed until Ultra Purge™ is ejected from the machine.
  5. Add the next production resin directly after Ultra Purge™. (In case of material change with different working temperature, empty the barrel from Ultra Purge™ before adding the next production resin and set the temperatures to the next production settings.)
  6. Extrude the next production resin at high speed to completely displace Ultra Purge™.
  7. If possible, replace the screen pack during this phase.
  8. If contamination persists, repeat steps.

Cleaning for Shut-Down and Start-Up – Extruder:

SHUT-DOWN

  1. We recommend keeping the barrel full of resin when adding Ultra Purge™ in the machine.
  2. We recommend removing the finest layer of the screen pack. Make sure that the pressure or torque force remains within the safety limits when running Ultra Purge™.
  3. Add Ultra Purge™ (1 barrel capacity).
  4. Purge out until the barrel is completely empty. DO NOT ADD RESIN AFTER ULTRA PURGE™!
  5. Turn off the machine completely (do not leave heaters in “Maintenance/Idle” mode).

START-UP

  1. Turn on the machines to production settings, load half barrel capacity of Ultra Purge™ followed by your production resin and begin normal production.
  2. If possible, replace the screen pack during this phase.
  3. If contamination persists, follow the standard cleaning procedure. It is normal to see contamination being flushed out on startup.

Cleaning – Sheet Extrusion:

  1. Before starting the purging process, decrease the temps in the head middle area (-20°C/-36°F) and increase the temps on the sides (+20°C/+36°F).
  2. Manually remove all contaminations from the feeding area.
  3. We recommend keeping the barrel full of resin when adding Ultra Purge™ in the machine.
  4. We recommend removing the finest layer of the screen pack. Make sure that the pressure or torque force remains within the safety limits when running Ultra Purge™.
  5. Add Ultra Purge™; the amount required for the purging process equals 1 full system capacity (barrel and head).
  6. Load the next production resin directly after Ultra Purge™.
  7. When Ultra Purge™ starts to be ejected, increase the screw rotation to the maximum safe speed to flush out all contaminations.
  8. Set all the parameters to the next production settings and begin normal production.
  9. If possible, replace the screen pack during this phase.
  10. If contamination persists, repeat steps.

Cleaning for Shut-Down and Start-Up – Sheet Extrusion:

SHUT-DOWN

  1. We recommend keeping the barrel full of resin when adding Ultra Purge™ in the machine.
  2. Manually remove all contaminations from the feeding area.
  3. We recommend removing the finest layer of the screen pack. Make sure that the pressure or torque
  4. force remains within the safety limits when running Ultra Purge™.
  5. Add Ultra Purge™. The amount of Ultra Purge™ required for the purging process equals 50% of the system volume capacity (barrel and head).
  6. Purge out until the barrel is completely empty. DO NOT ADD RESIN AFTER ULTRA PURGE™!
  7. Turn off the machine completely (do not leave heaters in “Maintenance/Idle” mode).

START-UP

  1. Turn on the machine to production settings.
  2. Add Ultra Purge™. The amount of Ultra Purge™ required for the purging process equals 50% of the system volume capacity (barrel and head). Load the next production resin directly after Ultra Purge™.
  3. Reduce the screw rotation speed. When Ultra Purge™ starts to be ejected, increase the screw rotation to the maximum safe speed to flush out all contaminations.
  4. Set all the parameters to production settings and begin normal production.
  5. If possible, replace the screen pack during this phase.
  6. If contamination persists, follow the standard cleaning procedure. It is normal to see contamination being flushed out on startup.

Dosage

Please refer to specific cleaning process.

Storage/Handling

Ultra Purge™ 5160 should be stored in a dry indoor area at room temperature. For further information on storage, handling, hazards, etc. please refer to safety data sheet.

Shelf Life

18 months

Packaging

Ultra Purge™ 5160 is available in a variety of package sizes. Please contact Chem-Trend customer service for details.

Ultra Purge™ 2020

三 17, 2019   //   by admin   //   未分类  //  0 评论

使用Ultra-X™ 技术的即用型清洗料

优点

  • 高效
  • 快速清洗
  • 容易使用
  • 对人机安全
  • 应用范围广

Description 产品描述

Ultra Purge™ 2020 是一款含有Ultra-X™ 技术的即用型颗粒清洗剂。可用于螺杆,炮筒,喷嘴,热流道和注塑机树脂料喷射阀门的清洗。

Ultra Purge™ 2020 也能用于片状挤塑线和带有或不带有储能器的吹塑机的清洗。这款清洗料是由高质量的热塑性树脂和高效的清洗添加剂组成,不含有研磨填料。

Ultra Purge™ 2020 能用于加工温度在160°C (320°F) 到350°C (662°F).

清洗料特别推荐用于色料和物料转换,以及用于清除黑色斑点,积碳和停机时使用。

Ultra Purge™ 2020 适用于下列热塑性树脂:

树脂 适用性
非结晶树脂
结晶树脂 ++
PA, POM ++
PET
Polyolefins 聚烯烃 +
PS +
TPE-TPR +
高温工程树脂
PVC ++
TPU ++
透明的聚酰胺,CA,CAB,或者从任何树脂转换到
PMMA
从任何树脂转换到 PC
从任何树脂转换到PMMA


典型特性

外观          灰褐色和半透明白色颗粒的混合物
 

特别声明

不要用于硬度低于45HRC 的镜面抛光面。
不要把Ultra Purge™ 产品通过加热的加料管加入,Ultra Purge™ 产品在 80°C / 176°F 下即开始熔化。.
浸泡时间不建议超过推荐的时间。
每次清洗,不要使用比推荐量更多的Ultra Purge™
处理热敏性树脂或添加剂时,不要升高温度。
不要成型难脱模的部件,Ultra Purge 会成型不满。Do not mold difficult- to-eject parts – when molding Ultra Purge™ you may get a short shot.
不要在Ultra Purge™ 的工作温度以外使用它。

应用

本文描述了如何一般使用Ultra Purge™产品。对于客户的特别应用,需要您咨询离您最近的肯天销售办公室或者当地的分销商。

请在使用Ultra Purge™前认真阅读相关的SDS。

我们推荐您采用下列清洗程序。


注塑工艺-螺杆和炮筒的清洗

  1. 把射台移到向后的位置。我们推荐在向设备添加Ultra Purge™ 时,炮筒里保持充满树脂。
  2. 手工清除料斗/混合器/过滤器中所有可能的污染源。
  3. 加入Ultra Purge™ (充满炮筒).
  4. 开始空射直到你看到Ultra Purge™ 被喷出喷嘴。
  5. 对于大于500 吨的机器,我们推荐把射胶量减少到最大射胶量的20%。
  6. 为达到最佳性能,我们推荐浸泡时间为3 分钟。
  7. 在加入Ultra Purge™ 后直接加入即将要生产的树脂/色料并开始空射直到Ultra Purge™ 被置换出来。(对于换料时要使用不同的工作温度的情况,要先把炮筒中的Ultra Purge™ 清空后再开始加入即将要生产的树脂原料 )
  8. 空射4-5 次,让即将生产的树脂完全取代Ultra Purge™.
  9. 假如污染还没有清除,重复上面的步骤。


清洗热流道系统 – 开模 – 注塑:

  1. 我们推荐在向设备中加入Ultra Purge™时保持炮筒里充满树脂。
  2. 如果可能,我们推荐升高热流道(尖端和歧管),和喷嘴的温度30°C/54°F。
  3. 手工清除料斗/混合器/过滤器中所有可能的污染源。
  4. 加入Ultra Purge™ (充满炮筒)。
  5. 在开模的状态下,开始注塑直到你看到Ultra Purge™被挤出热流道。
  6. 对于大于500 吨的机器,我们推荐把射胶量减少到最大射胶量的20%。
  7. 为达到最佳性能,我们推荐清洗料在炮筒中浸泡时间为3 分钟。在加入Ultra Purge™ 后直接加入即将要生产的树脂
  8. 持续挤出 Ultra Purge™.
  9. 空射4-5 次,让即将生产的树脂完全取代Ultra Purge™ 。把所有参数调整成为即将生产的树脂准备。
  10. 假如污染还没有清除,重复上面的步骤。


清洗热流道系统 – 闭模 – 注塑:

  1. 我们推荐在向设备中加入Ultra Purge™时保持炮筒里充满树脂。.
  2. 如果可能,我们推荐升高热流道(尖端和歧管),和喷嘴的温度30°C/54°F。
  3. 手工清除料斗/混合器/过滤器中所有可能的污染源。
  4. 加入Ultra Purge™ (充满炮筒),并且开始注塑成型直到全部的 Ultra Purge™ 都被注塑出来。
  5. 在加入Ultra Purge™ 后直接加入即将要生产的树脂
  6. 在 Ultra Purge™ 后继续注塑产品。
  7. 成型4-5 次,让即将生产的树脂完全取代Ultra Purge™ 。把所有参数调整成为即将生产的树脂准备。
  8. 假如污染还没有清除,重复上面的步骤。


关机和开机前的清洗-注塑:

关机

  1. 把射台移到向后的位置。我们推荐在向机器添加Ultra Purge™ 时,炮筒里保持充满树脂。
  2. 加入半个炮筒的 Ultra Purge™.
  3. 减少射胶量并且持续挤出直到炮筒清空。在ULTRA PURGE™ 后不要加入树脂。
  4. 彻底关闭机器,不要把加热器设在“维护/空闲”模式下

开机

  1. 开机到生产设置,加入半个炮筒的Ultra Purge™ ,然后加入即将要生产的树脂,然后开始正常的生产。
  2. 如果污染还没有清除,就开始标准的清洗程序。在开机时看到污染物被排除是正常的。


清洗螺杆和炮筒-挤出机:

  1. 我们推荐在向设备中加入Ultra Purge™时保持炮筒里充满树脂。
  2. 我们建议去掉最细的一层过滤网。确保在使用Ultra Purge™时压力和扭矩力都保持在安全范围以内。
  3. 加入Ultra Purge™(大概1.5 倍的挤出机料桶的容积).
  4. 慢速下不断挤出直到看见 Ultra Purge™
  5. 我们推荐让Ultra Purge™ 在炮筒中静置5 分钟,对于比较难清洗的情况,让Ultra Purge™ 在炮筒中静置10分钟。
  6. 在加入Ultra Purge™ 后直接加入即将要生产的树脂(对于换料时要使用不同的工作温度的情况,要先把炮筒中的Ultra Purge™ 清空后再开始加入即将要生产的树脂原料,并且把温度条件设定为满足要生产的树脂 )
  7. 在高速下连续挤出即将要生产的树脂以便完全排出Ultra Purge™.
  8. 如果可能,在这一步更换滤网。
  9. 假如污染还没有清除,重复上面的步骤。


关机和开机的清洗-挤出机:

关机

  1. 我们推荐在向设备中加入Ultra Purge™时保持炮筒里充满树脂。
  2. 我们建议去掉最细的一层过滤网。确保在使用Ultra Purge™时压力和扭矩力都保持在安全范围以内。
  3. 加入Ultra Purge™ (充满炮筒)。
  4. 持续挤出直到炮筒清空。在ULTRA PURGE™ 后不要加入树脂。
  5. 彻底关闭机器,不要把加热器设在“维护/空闲”模式下。

开机

  1. 开机到生产设置,加入半个炮筒的Ultra Purge™ ,然后是即将要生产的树脂,然后开始正常的生产。
  2. 如果可能,在这一步更换滤网。
  3. 如果污染还没有清除,就开始标准的清洗程序。在开机时看到污染物被排出是正常的。


带有储能器的吹塑机的清洗:

  1. 在开始清洗前,如果可能,把储料缸的温度升高至少30°C/54°F。
  2. Ultra Purge™ 的需要量(公斤)为储料缸容积的7倍。比如说4 升的储料缸需要27 公斤的Ultra Purge™待用。
  3. 当 Ultra Purge™ 投入机器后,把储料缸的温度设定回正常生产时使用的温度。请注意在大型的机器上通常需要超过1 个小时的时间来降温。
  4. 加入Ultra Purge™ 并开始不断的挤出直到Ultra Purge™ 从模具中挤出。
  5. 降低坯料的厚度,把储料缸的给料速度调到最大。
  6. 让Ultra Purge™ 在炮筒和储料缸里静置 5-10 分钟
  7. 在加入Ultra Purge™ 后直接加入即将要生产的树脂
  8. 在4-5 次薄壁吹塑后,把壁厚增大,用待生产的树脂在全冲程下把污染物快速排出。
  9. 把所有参数调整成为即将生产的树脂准备。假如污染还没有清除,重复上面的步骤。

关机和开机的清洗–带有储能器的吹塑机:

关机

  1. 加入Ultra Purge™ 并开始不断的挤出直到Ultra Purge™ 从模具中挤出。
  2. 降低坯料的厚度,把储料缸的给料速度调到最大。
  3. 在4-5 次薄壁吹塑后,把壁厚增大,将设备射空。在ULTRA PURGE 之后不要再加入任何树脂。
  4. 彻底关闭机器,不要把加热器设在“维护/空闲”模式下。

开机

  1. 开机到生产设置。
  2. 加入Ultra Purge™ 并开始不断的挤出直到Ultra Purge™ 从模具中挤出。降低坯料的厚度,把储料缸的
  3. 给料速度调到最大。
  4. 让Ultra Purge™ 在炮筒和储料缸中静置5-10 分钟
  5. 在4-5 次薄壁吹塑后,把壁厚增大,用待生产的树脂在全冲程下把污染物快速排出。
  6. 开始正常的生产。如果污染还没有清除,就开始标准的清洗程序。在开机时看到污染物被排出是正常的

不带有储能器的吹塑挤出机的清洗:

  1. 我们推荐在向设备中加入Ultra Purge™时保持炮筒里充满树脂。
  2. 对于比较困难的色料转换以及去除黑色的斑点,应该把挤出头的温度升高30°C/54°F对于比较容易的色料转换和热敏性材料,不要升高温度。
  3. 我们建议去掉最细的一层过滤网。确保在使用Ultra Purge™时压力和扭矩力都保持在安全范围以内。
  4. 加入Ultra Purge™(大概1.5 倍的炮筒的容积)
  5. 如果有的话,把挤出头上方的清洗阀门打开,以便树脂在清洗过程中从此处排空。
  6. 当看见 Ultra Purge™ 从模具中排出后,让Ultra Purge™ 在炮筒和储料缸里静置 5-10 分钟。在加入Ultra Purge™ 后直接加入即将要生产的树脂。
  7. 如果可能的话,交替性的增大和减小配料的壁厚,以便排除污染物。
  8. 如果可能,在这一步更换滤网。
  9. 把所有参数调整成为即将生产的树脂准备。假如污染还没有清除,重复上面的步骤。


关机和开机的清洗–不带有储能器的吹塑机:

关机

  1. 我们建议去掉最细的一层过滤网。确保在使用Ultra Purge™时压力和扭矩力都保持在安全范围以内。
  2. 当所有待生产的树脂都用完后,加入炮筒容积1 半的Ultra Purge™
  3. 如果有的话,把挤出头上方的清洗阀门打开,以便树脂在清洗过程中从此处排空。
  4. 在慢速的螺杆转速下把炮筒彻底清空。
  5. 彻底关闭设备,不要把加热器设在“维护/空闲”模式下。

开机

  1. 开机到生产设置。
  2. 在慢速螺杆转动下加入Ultra Purge™,直到它从模具中被挤出。控制Ultra Purge™在5-10 分钟内流过炮筒。
  3. 在加入Ultra Purge™ 后直接加入即将要生产的树脂并开始正常的生产。
  4. 如果可能,在这一步更换滤网。
  5. 如果污染还没有清除,就开始标准的清洗程序。在开机时看到污染物被排出是正常的。


片材挤出设备的清洗:

  1. 开始清洗工艺之前,把挤出模头的中间区域温度降低20°C/36°F 而把边缘的温度升高20°C/36°F
  2. 人工清除加料区域的污染。
  3. 我们推荐在向设备中加入Ultra Purge™时保持炮筒里充满树脂。
  4. 我们建议去掉最细的一层过滤网。确保在使用Ultra Purge™时压力和扭矩力都保持在安全范围以内。
  5. 加入1 个(炮筒+挤出模头)容量的 Ultra Purge™.
  6. 在慢速螺杆转动下挤出Ultra Purge™,控制Ultra Purge™在5-10 分钟内流过炮筒。
  7. 在加入Ultra Purge™ 后直接加入即将要生产的树脂。
  8. 当Ultra Purge™ 开始被挤出后,增大螺杆转速到最大安全速度,以便快速排除所有的污染物。
  9. 把所有参数调整成为即将生产的树脂准备,并开始正常的生产。
  10. 如果可能,在这一步更换滤网。
  11. 假如污染还没有清除,重复上面的步骤。

关机和开机的清洗–片材挤出设备:

关机

  1. 我们推荐在向设备中加入Ultra Purge™时保持炮筒里充满树脂。
  2. 人工清除加料区域的污染。
  3. 我们建议去掉最细的一层过滤网。确保在使用Ultra Purge™时压力和扭矩力都保持在安全范围以内。
  4. 加入半个(炮筒+挤出模头)容量的 Ultra Purge™
  5. 把炮筒彻底清空。在ULTRA PURGE 之后不要再加入任何树脂。
  6. 彻底关闭机器,不要把加热器设在“维护/空闲”模式下。

开机

  1. Turn on the machine to production settings. 启动设备,调整至生产参数。
  2. 加入半个(炮筒+挤出模头)容量的Ultra Purge™ ,然后加入即将要生产的树脂。
  3. 在慢速螺杆转动下挤出Ultra Purge™,当Ultra Purge™ 开始被挤出后,增大螺杆转速到最大安全速度,以便快速排除所有的污染物。
  4. 把所有参数调整成为即将生产的树脂准备,并开始正常的生产。
  5. 如果可能,在这一步更换滤网。
  6. 如果污染还没有清除,就开始标准的清洗程序。在开机时看到污染物被排出是正常的。


用量

具体根据不同的清洗工艺而定。

储存/处理

Ultra Purge™ 2020 应该在室温下被储存在干燥的室内。更多关于储存,处理,危害的信息,请参见相应的SDS。

保质期

18 月

包装

Ultra Purge™ 2020 有各种不同的包装类型,具体请询问肯天的客服人员。


油污问题的解决方案

六 16, 2013   //   by admin   //   未分类  //  0 评论

注塑过程中油污的问题是一直困扰着大家,油污造成的生产浪费也是不计其数,油污也会影响塑料制品的电镀喷涂等二次加工。

那么油污是如何产生的呢?主要有三方面的原因:

  1. 防锈剂喷在模具上,直接渗入模具内造成油污的问题;
  2. 顶针油的不耐润滑性,在生产过程中容易渗出模具造成油污的产品;
  3. 一方面清洗剂清洗防锈剂时将防锈剂带入模具内,另一方面清洗剂会将润滑油溶解从而造成油污渗出;

lusin protect G31 和lusin 的顶针油能彻底的解决这些油污的问题;

以下是维护类产品使用时注意事项。

模具维护类产品的使用注意事项:

系列 品名 规格 用途
喷雾罐 蜡型防锈剂G31 400ml/罐 12罐/箱 干性、不流动,1至2年的长期防锈。该防锈剂上机前无需用清洗剂清洗,可直接打产品带掉。皮纹面3模内,镜面高光面10模内。局部擦拭
除脂剂L11 400ml/罐 12罐/箱 高效去除模具或产品表面的防锈剂、脱模剂等油污的残留,符合白色家电产业的欧标无卤要求。
模具清洗剂L21 400ml/罐 12罐/箱 去除模具表面的低分子析出物(或称之为汽痕),解决制品发亮问题。
白色膏状顶针油PZO152 400ml/罐 12罐/箱 2至3万模次的高压、高温润滑,模具在150℃以下的固态润滑,不往外渗油污。

防锈剂lusin cleanG31 成本分析:

根据客户提供的信息:洗一次模具需要用3~4罐清洗剂;洗完后需打掉5~7模制品后能够打出合格品:

成本:3*21元(每罐清洗剂的成本)+6*30元(每个制品的成本,按照平均2公斤/个*15=30元)>>**元/罐(lusin cleanG31的成本);用lusin需要打掉2模,另外还有防锈剂本身的成本按照每台设备平均每天换模一次计算,按照20台注塑机生产计算,每天防锈剂的用量3瓶/月计算,90瓶/月,一年按照工作300天计算:

国产防锈的使用造成的实际成为151.5元/年,而用lusin的成本为**.5/年,用G31,公司每年可多赚钱:151.5-**>>60万元;目前是按照每台设备平均每天换模一次计算,越多换模成本也就越高。另外还没计算清洗剂用完之后的合格率的成本。

顶针油lusin lub pzo152

防锈剂和顶针油是造成油污问题的关键所在;顶针油所造成的成本浪费可直接从报废的制品数来计算:

按照20台的设备计算预估,每周保养一次,3罐/次,每月用量约12罐/月;每月造成的报废数:20 台*4模*4次=320个/月;每年费用:320*10个月*30元/个制品=96000元;国产顶针油的成本:12*40元/罐*10月=4800元;共成本:96000+4800+油污使用的清洗剂+时间浪费的成本>>10万元;用lusin lub pzo152成本:**元*12*10<<10万元

多赚得金额会大于9万元;